Authentik
In order to use Authentik, you must be using SSL as outlined in this project.
This Authentik installation is based on the single application proxy provider configuration.
There are no authentik proxy containers defined in the docker-compose.yml file. This is because authentik will auto-detect the Docker socket and be able to start/stop its own proxy containers by using the configurations below.
Authentik is able to be controlled on a per-container basis, but requires a bit of configuration as outlined below.
Important Note
If you are using Cloudflare Tunnel AND you have disabled port forwarding to 80/443, you MUST create a new "public hostname" in Tunnel in order for SSO to work since the SSO server needs to be publicly accessible. If your Tunnel is online and working, follow step 4 when setting up Tunnel and configure it for the authentik-server:9001 container.
However, any containers configured to be accessible through the Cloudflare Tunnel will not be protected by Authentik if accessed via the Tunnel if you do not configure it as outlined in the 'Authentik through Cloudflare Tunnel' section below
Enabling Authentik on Individual Containers
-
Enable the
authentikcontainer in the Container Map -
Set the
authentikvariable totruefor the containers you want in the Container Map.a. Example using Sonarr:
hms_docker_container_map:
  sonarr:
authentik: true -
Run the playbook as normal
-
Once all containers are started, go to
https://authentik.< domain >/if/flow/initial-setup/to create the initial user and password to continue Authentik setup (if you changed theproxy_host_rulevalue for the authentik container, use that subdomain instead) -
Configure an Application and Provider within Authentik
a. Login
b. Go to the Admin panel
c. Expand
Applicationson the leftd. Click
Applicationse. Click
Create with Providerf. Give it the same name as the application (such as Sonarr)
g. Select the Provider Type of
Proxy Providerh. Select
Forward auth (single application)and configure any other settingsi. Set the
External hostto the URL of the application (such ashttps://sonarr.< domain >)j. Click through the menus, customizing what you want, and finish
-
Configure an Application Outpost
a. Do a-c (above in step 5) again
b. Click
Outpostsand thenCreatec. Give it a name, the
typeisProxyand integration should be theLocal Docker connectiond. Select the application you created in step 5 to associate it to
e. Expand
Advanced settingstipIMPORTANT: copy the content of the file for the container generated in:
< hms_docker_apps_path >/authentik/outposts/authentik-< container_name >-output.yml(so by default:/opt/hms-docker/apps/authentik/outposts/...) to your clipboard- If a configuration does not exist for the container you want, ensure you've enabled Authentik as outlined in steps 1 and 2
f. Replace the configuration in the Authentik webpage with this generated configuration, otherwise stuff will not work correctly.
g. Once you click create, it will automatically create a new
authentik-proxycontainer that will handle authentication.h. It may take some time to download and setup the proxy, be patient
noteThis
authentik-proxycontainer (and also any associated networks it's connected to) will not be deleted if the Compose stack is removed since the container is not defined in the Compose file and the container is using those networks -
Troubleshooting
a. Using the Traefik and Portainer dashboards help a LOT during the troubleshooting process
b. If you're getting a
404 not founderror, this is likely due to theauthentik-proxycontainers not working, running, or not being configured correctly. Check Portainer. If you just configured a new application outpost, wait a couple more minutes, but it should show in Portainer as well.c. If you're getting a
500server error, this is possibly due to having duplicate Traefik routes for the same host rules, check Traefik logs and/or Portainer logs for the correctauthentik-proxycontainer.
Authentik Protection through Cloudflare Tunnel
This requires a large amount of work (creating Authentik Applications, Providers, and Outposts for each individual enabled container) and is (in my personal opinion) not recommended. I would use Tailscale as a VPN solution to access the services from only internally, but everyones use cases and environment is different. By proceeding, you understand the risks and potential impact.
This has not been fully tested as a "secure" solution. I am not responsible for any misconfigurations that may insecurely expose your applications. It is your responsibility to understand and accept the risks and implement security controls where possible.
You will also need to use a first-level subdomain for applications (such as app1.example.com), so your Traefik TLS/SSL should be issued for *.example.com, you cannot use deeper than one level (app1.sub.example.com). This is a limitation of Cloudflare Tunnel and requires you to purchase an Advanced Certificate for the hostname if you wish to do this.
This flow also bypasses the Traefik IP Allowlist controls since the request is seen as coming from the Tunnel container, which falls into the RFC1918 private address space
After deploying the Cloudflare Tunnel by following up to Step 4 in the Cloudflare Tunnel Docs, follow these steps:
-
Set
hmsdocker_authentik_enabled_through_cftunnelininventory/group_vars/all/authentik.ymltotruea. This is HIGHLY recommended so that Authentik is enabled for containers by default
b. Failing to enable this will mean containers are not forced to have Authentik if the container is enabled in the future and forgotten to have Authentik enabled for it individually
-
Create a new published application route with the following settings:
a. Subdomain:
*b. Domain: select your domain
c. Service Type:
HTTPSd. Service URL:
traefik -
Enable "No TLS Verify" in the Advanced application settings under TLS:
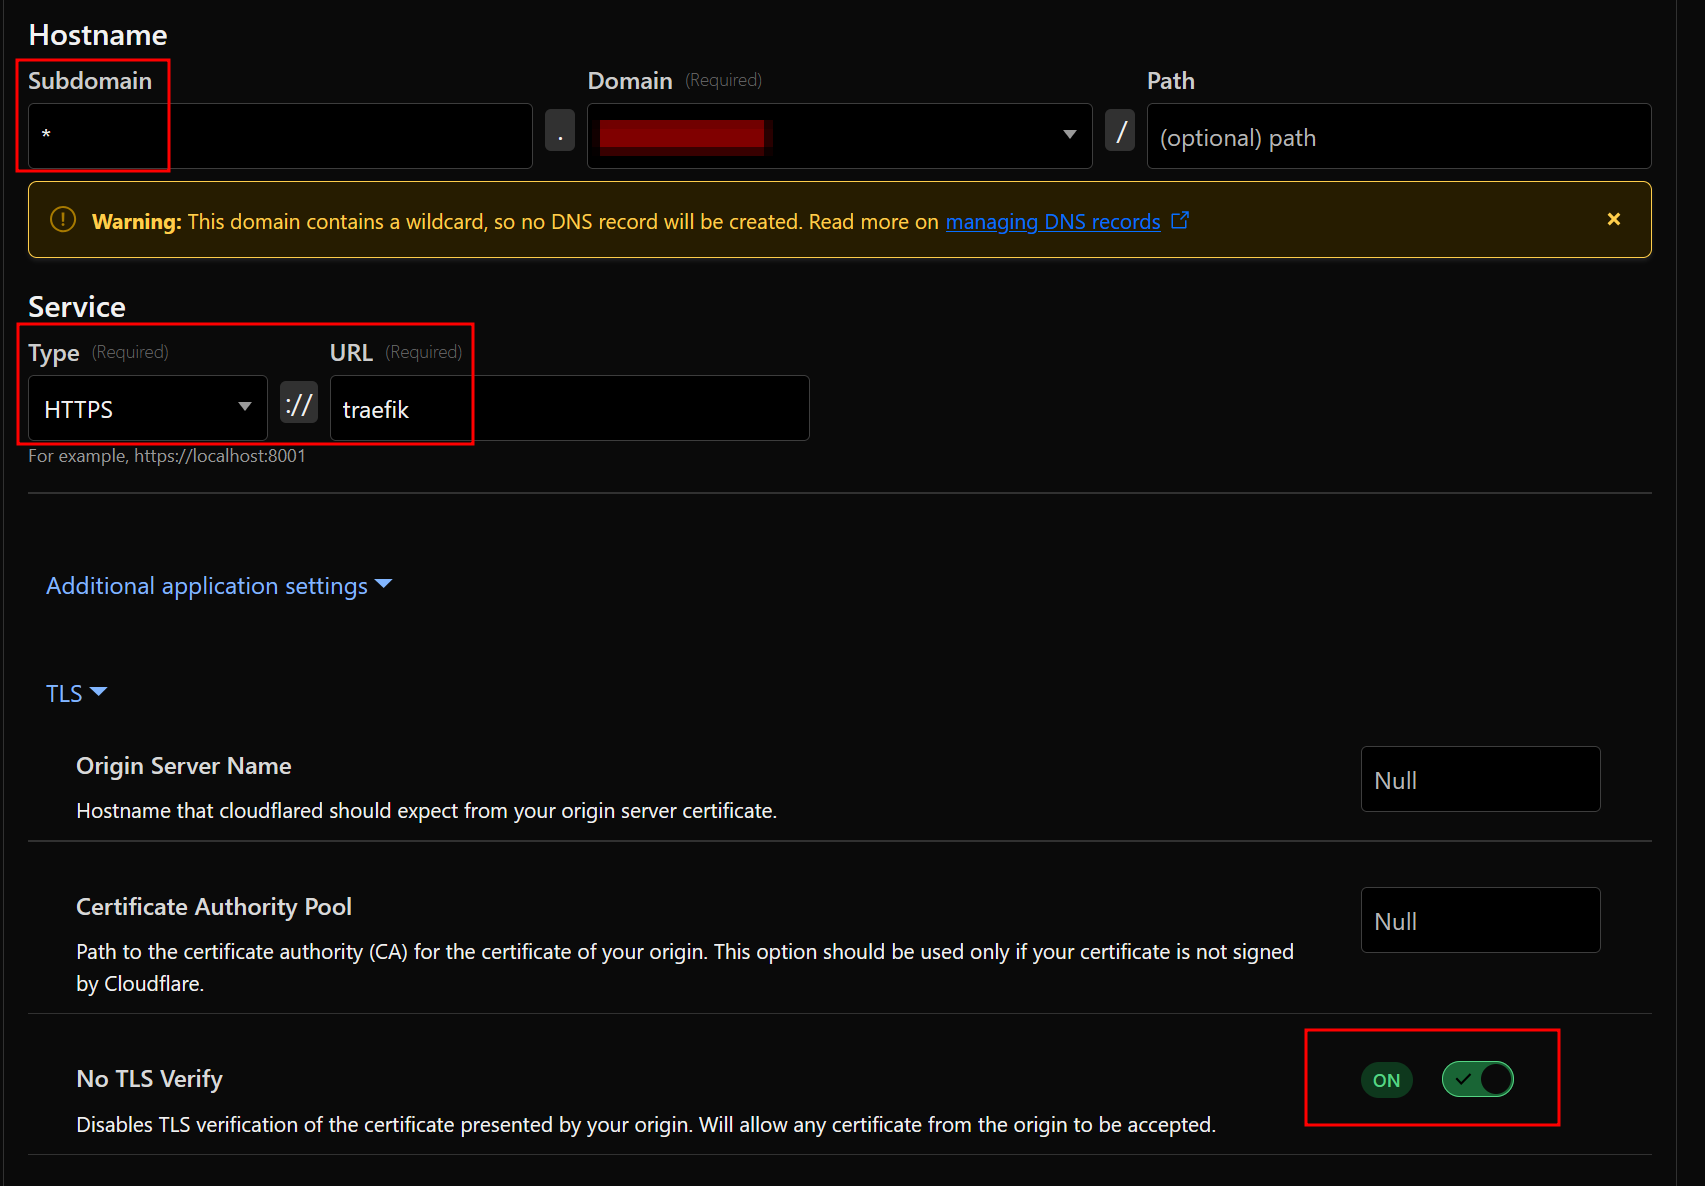
-
Manually create wildcard DNS
CNAMErecord for*.<domain>that points to<Tunnel ID>.cfargotunnel.comand make sure it's proxied. You cannot create this record via the Tunnel dashboard -
Test to see if it works
If you ever decide to disable/remove Authentik in the future, YOU MUST CLEAN UP THE CLOUDFLARE TUNNEL MANUALLY BEFORE DOING SO, otherwise services will be exposed to the public WITH NO PROTECTION through the Tunnel
How the Authentik secret keys are stored
There are 2 files created when enabling Authentik, .authentik.key and .authentik.pgpass within the project directory. These files store the Authentik secret key and Authentik postgres database password respectively. For security, these files are owned by root:root with mode 0600 so no one other than the root user can read/modify them.
These values are stored in these files for persistence since they are generated randomly upon first launch and are required for Authentik to work correctly. If these values are changed or lost, Authentik will no longer work and will need to be reset to defaults.
Since the .env file will be continually updated with new values and these 2 randomly generated values need to remain persistent, Ansible will read/slurp these 2 files created and retrieve the values, ensuring the values within the .env are the same each time during every playbook run.
To ensure these key and pgpass files are not changed by Ansible, force: no is set on the template resource that creates these files.
Upgrading Authentik
In Version 1.12, Authentik was upgraded from version 2025.2.4 to the current latest version, 2025.8.4.
This upgrade introduced a Postgresql update from v12 to v16, which requires performing a manual database update and migration to the new version.
Wiping and Starting Fresh
If you do not want to do this and do not care to wipe Authentik and start from scratch, you can do the following:
cd /opt/hms-docker
sudo docker compose down

cd /opt/hms-docker/apps
sudo rm -rf authentik

docker volume rm -f hms-docker_authentik_database hms-docker_authentik_database_backup hms-docker_authentik_geoip hms-docker_authentik_redis
Then re-run the playbook using sudo make apply and follow the steps above in Enabling Authentik on Individual Containers
Performing Upgrade
The steps below have been adapted from these official docs: https://docs.goauthentik.io/troubleshooting/postgres/upgrade_docker/
Please note I am not responsible for any data loss during this process.
-
Comment out/remove these lines from the
authentik-postgresqlcontainer in/opt/hms-docker/compose_files/authentik.yml(lines 6 and 7):networks:
- authentik_net -
Add the following to an existing or new
/opt/hms-docker/docker-compose.override.ymlfile:services:
authentik-postgresql:
image: postgres:12-alpine
network_mode: none
authentik-redis:
image: redis:alpine
authentik-server:
image: ghcr.io/goauthentik/server:latest
authentik-worker:
image: ghcr.io/goauthentik/server:latest -
Run the following commands to perform a backup of the existing database (this will take down Authentik during this process):
a. Start containers with new override values:
cd /opt/hms-docker
sudo docker compose up -d
b. Create directory to store backup
# In /opt/hms-docker
sudo mkdir authentik_upgrade_pg12 && sudo chown ${USER}:${USER} authentik_upgrade_pg12
cd authentik_upgrade_pg12
c. Perform postgresql dump to file
# In /opt/hms-docker/authentik_upgrade_pg12
sudo docker compose -f ../docker-compose.yml -f ../docker-compose.override.yml exec authentik-postgresql pg_dump -U authentik -d authentik -cC > upgrade_backup_12.sql
d. Validate that the new
upgrade_backup_12.sqlfile contains your datae. Stop only the authentik containers
cd /opt/hms-docker
sudo docker compose down authentik-postgresql authentik-redis authentik-server authentik-worker
f. Create new volume for database backup
docker volume create hms-docker_authentik_database_backup && docker run --rm -v hms-docker_authentik_database:/from -v hms-docker_authentik_database_backup:/to alpine sh -c 'cd /from && cp -a . /to'g. DANGER: this next command will delete the (now backed up) database, ensure the backup has the correct data before continuing
docker volume rm -f hms-docker_authentik_database -
Change the
/opt/hms-docker/docker-compose.override.ymlfile to:services:
authentik-postgresql:
image: docker.io/library/postgres:16-alpine
network_mode: none
authentik-redis:
image: docker.io/library/redis:alpine
authentik-server:
image: ghcr.io/goauthentik/server:2025.8
authentik-worker:
image: ghcr.io/goauthentik/server:2025.8 -
Run the following commands:
a. Pull new images with the new override images and start and force recreate only the postgresql container:
cd /opt/hms-docker
sudo docker compose pull authentik-postgresql authentik-redis authentik-server authentik-worker && sudo docker compose up --force-recreate -d authentik-postgresql
b. Import the backup into the new postgresql container
cd /opt/hms-docker/authentik_upgrade_pg12
cat upgrade_backup_12.sql | sudo docker compose -f ../docker-compose.yml -f ../docker-compose.override.yml exec -T authentik-postgresql psql -U authentik -
Change the
/opt/hms-docker/docker-compose.override.ymlto (just removing thenetwork_mode: noneline):services:
authentik-postgresql:
image: docker.io/library/postgres:16-alpine
authentik-redis:
image: docker.io/library/redis:alpine
authentik-server:
image: ghcr.io/goauthentik/server:2025.8
authentik-worker:
image: ghcr.io/goauthentik/server:2025.8 -
Force recreate all Authentik containers with new images:
sudo docker compose up --force-recreate -d authentik-postgresql authentik-redis authentik-server authentik-worker -
Run the new version of the playbook using
sudo make apply -
Validate that Authentik is running, contains your data, and is on the latest version (2025.8.4)
-
Delete the
docker-compose.override.ymlfile if not in use, otherwise remove the entries added for Authentik during this process -
Run
sudo docker compose up -dafter removing or modifying thedocker-compose.override.ymlfile -
Once you've confirmed everything is working as expected, you can then remove the database backup volume by running
docker volume rm hms-docker_authentik_database_backup